Creating effective bar plots in ggplot2 requires knowing which function to use for your data structure. This comprehensive guide demonstrates three essential approaches—geom_bar() for raw data, geom_col() for summarized values, and stat_count() for explicit control—with practical R code examples you can immediately apply to your own datasets.”
library(tidyverse)
theme_set(theme_bw(16))
mpg |> head()

# A tibble: 6 × 11
  manufacturer model displ  year   cyl trans      drv     cty   hwy fl    class
  <chr>        <chr> <dbl> <int> <int> <chr>      <chr> <int> <int> <chr> <chr>
1 audi         a4      1.8  1999     4 auto(l5)   f        18    29 p     compa…
2 audi         a4      1.8  1999     4 manual(m5) f        21    29 p     compa…
3 audi         a4      2    2008     4 manual(m6) f        20    31 p     compa…
4 audi         a4      2    2008     4 auto(av)   f        21    30 p     compa…
5 audi         a4      2.8  1999     6 auto(l5)   f        16    26 p     compa…
6 audi         a4      2.8  1999     6 manual(m5) f        18    26 p     compa…
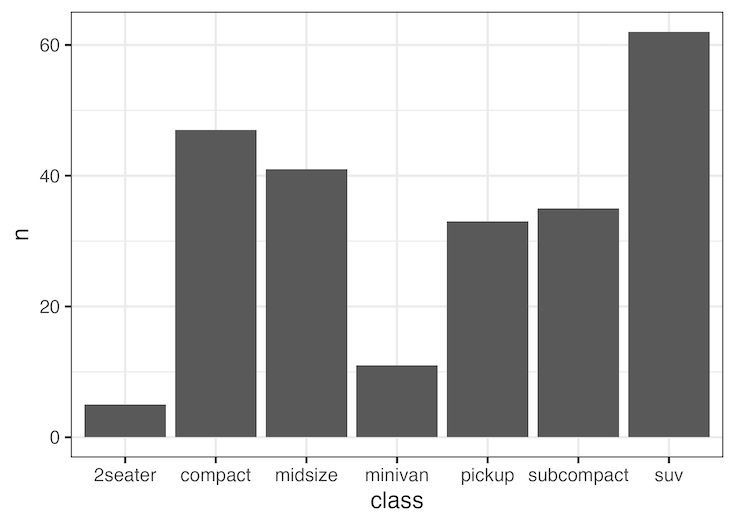
Bar plot with geom_bar()
mpg |>
  ggplot(aes(x=class))+
  geom_bar()


Bar plot with stat_count()
mpg |>
  ggplot(aes(x=class))+
  stat_count(geom="bar")

Bar plot with geom_col()
mpg |>
  count(class) |>
  ggplot(aes(x=class, y =n))+
  geom_col()
When to Use Each ggplot2 Bar Plot Function
geom_bar()
Use when: You have individual observations and want ggplot2 to automatically count occurrences.
Data example: A column with “SUV”, “compact”, “SUV”, “midsize” → automatically counts each type
geom_col()
Use when: Your data already contains the values you want to plot (heights of bars).
Data example: Region A = 100 sales, Region B = 150 sales → plot these exact values
stat_count()
Use when: You want the same result as geom_bar() but prefer explicit control over the statistical transformation.
Note: Functionally identical to geom_bar() – use whichever you prefer
Quick Reference
geom_bar()
geom_col()
stat_count()
🤔 Not Sure Which to Use?
Start with geom_bar() for raw data or geom_col() for summary data
Explore the Complete ggplot2 Guide
35+ tutorials with code: scatterplots, boxplots, themes, annotations, facets, and more—tested and beginner-friendly.
Visit the ggplot2 Hub → No fluff—just code and visuals.